Key Takeaway: Arduino servo motor control is straightforward with the built-in Servo library — wiring a hobby servo to your Arduino and using attach(), write(), and writeMicroseconds() lets you command precise 0–180° motion, and the same technique scales to industrial positioners and robot arms.
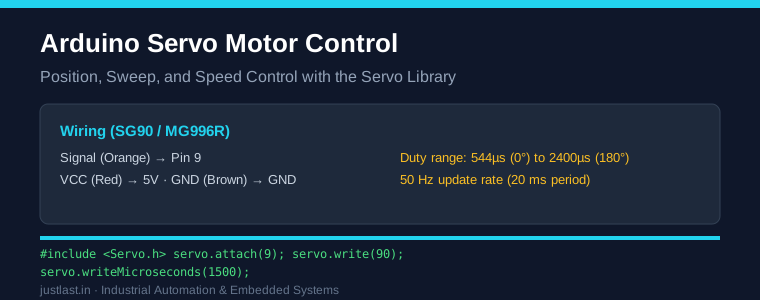
Table of Contents
- 1. How a Servo Motor Works
- 2. Hardware and Wiring for Arduino Servo Control
- 3. Using the Servo Library
- 4. Controlling Position with write()
- 5. Microsecond Control for Precision Angle
- 6. Sweep and Speed Control Examples
- 7. Power Requirements and Common Mistakes
- 8. Scaling to Industrial Applications
- 9. FAQ
1. How a Servo Motor Works
A hobby servo (SG90, MG996R) is a complete closed-loop positioner in one package: a DC motor, a gear train, a potentiometer on the output shaft for position feedback, and a small control board. It accepts a single PWM signal on its signal pin. The pulse width dictates the angle. A 1.5 ms pulse centers the shaft, about 0.5–0.7 ms drives it fully one way, and about 2.4 ms drives it the other way. The servo’s internal controller compares the incoming pulse to the feedback potentiometer and drives the motor until they match, so it holds position against small external loads.
2. Hardware and Wiring for Arduino Servo Control
Most hobby servos have three wires. Connect the orange or white signal wire to an Arduino PWM-capable pin such as pin 9, the red wire to 5V, and the brown or black wire to GND.
Caution: powering a servo from the Arduino’s 5V pin works for one small servo at low load, but an SG90 can draw several hundred milliamps and an MG996R much more — enough to brown out an Uno. For reliable prototyping, power the servo from a separate 5V supply with a common ground to the Arduino. Never connect servo power to the Arduino 5V when using larger servos.
3. Using the Servo Library
The Arduino IDE ships with the Servo library, so no download is needed. The two essential calls are:
Servo myservo; — create a servo object. myservo.attach(pin); — connect the object to a digital pin. After attach, the library begins generating the 50 Hz PWM signal automatically. You can attach up to 12 servos on an Uno using pins 9 and 10 for the high-accuracy timer channels.
4. Controlling Position with write()
The simplest way to command a servo is myservo.write(angle), where angle is 0 to 180 degrees. The library converts that angle into an appropriate pulse width and drives the servo there. This is ideal for pan-and-tilt mechanisms, test jigs, and simple robot arms.
To build smooth motion you increment the angle one degree at a time inside a delay loop, creating a slow sweep rather than an instant snap to position. This matters for industrial jigs where a sudden jump could knock a part off a fixture.
5. Microsecond Control for Precision Angle
For finer control, use myservo.writeMicroseconds(us) to send a pulse width directly in microseconds. Standard servos respond in the 544 µs (0°) to 2400 µs (180°) range, with roughly 1500 µs at center. Because angular travel per microsecond varies between servo models, calibrate your specific servo once: command a known microsecond value, measure the angle, and record the endpoints. writeMicroseconds is the right tool when you want sub-degree repeatability around a nominal pulse.
6. Sweep and Speed Control Examples
Here is a complete example that sweeps a servo from 0 to 180 degrees and back:
#include <Servo.h>
Servo myservo;
int pos = 0;
void setup() {
  myservo.attach(9);
}
void loop() {
  for (pos = 0; pos <= 180; pos += 1) {
    myservo.write(pos);
    delay(15);
  }
  for (pos = 180; pos >= 0; pos -= 1) {
    myservo.write(pos);
    delay(15);
  }
}
Speed control on a servo means pacing the angle increments. A larger delay between degree steps equals slower motion. For true velocity shaping and path control, compute the position profile in the loop rather than relying on fixed delays.
7. Power Requirements and Common Mistakes
Power is the number one issue. A stall current of 1 A on a metal-gear hobby servo will cause brownouts that reset your Arduino mid-motion and corrupt serial. Use a dedicated 5V/2A supply and a shared ground. Other frequent mistakes: drawing current from the wrong pin, forgetting the common ground (signal is referenced to the controller), and using a weak supply for multiple servos. Also note that some servos are 180° range while others are continuous-rotation; continuous-rotation servos ignore the angle and instead interpret pulse width as speed and direction.
8. Scaling to Industrial Applications
The closed-loop principle you learn with an Arduino servo maps directly to industrial servo drives and motion control. Industrial servos use an encoder for feedback and a dedicated servo drive, but the control loop concept is identical. For factory projects like an actuated gate, a robot gripper, or an OT table tilt mechanism, an Arduino with a hobby servo is a fast, cheap prototype stage before scaling to an STM32-driven industrial servo.
Frequently Asked Questions
Why is my Arduino servo jittering or buzzing?
Buzzing usually means the servo power is unstable or the servo is loaded near its limit. Check for a dedicated 5V supply, adequate current, and proper grounding on the servo.
Can I control a servo without the library?
Yes. You can generate the servo signal manually on a pin using pulse and delay functions, but the Servo library handles timing in the background and is more reliable. For many servos, use a 16-channel I2C PWM driver.
How many servos can an Arduino control?
An Uno can drive about 12 servos with the Servo library, but only a handful with independent precise timing. For large numbers, use a 16-channel PWM driver board via I2C.
Are hobby servos good enough for industrial use?
For prototyping and low-load automation, hobby servos work well. For continuous high-torque, high-precision work, use industrial servo motors with encoders and dedicated drives.
Related Reading
- STM32 vs Arduino for Industrial Automation: Complete 2026 Guide
- STM32 PWM for Motor Control: Timers, Duty Cycle & Dead-Time
- I2C Communication Complete Guide for STM32 and Arduino
Sources
- Arduino Servo Library Documentation
- Servo.writeMicroseconds() Reference
- Adafruit 16-Channel PWM/Servo Driver Guide
Disclosure: This post contains affiliate links. As an Amazon Associate, justlast.in may earn a commission on qualifying purchases at no extra cost to you.