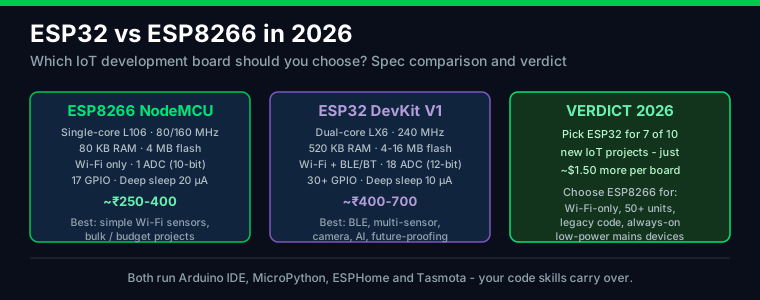
Key Takeaway: Build a complete temperature and humidity monitoring system with an ESP8266 NodeMCU and DHT22 sensor for under ₹700 and integrate it with Home Assistant via MQTT. This project gives you real-time environmental monitoring accessible from any device on your network, with data logging, alerts, and smart home automation triggers — all with basic soldering skills and a few hours of setup time.
DIY ESP8266 Temperature & Humidity Monitor
COMPONENTS NEEDED
• ESP8266 NodeMCU board (₹350-500)
• DHT22 sensor (temp + humidity) (₹200-350)
• 10kΩ resistor for DATA line pull-up
• Breadboard + jumper wires (₹100-200)
• Micro USB cable + 5V phone charger
• Optional: OLED display 128×64 (₹250)
• Optional: BME280 for barometric pressure
WIRING DIAGRAM
ESP8266 NodeMCU → DHT22
3.3V pin → DHT22 VCC (pin 1)
GND pin → DHT22 GND (pin 4)
D4 (GPIO2) → DHT22 DATA (pin 2)
3.3V → 10kΩ → DATA line (pull-up)
OLED (optional):
D1 (GPIO5)=SCL | D2 (GPIO4)=SDA
SOFTWARE CODE FLOW
1. Setup Phase
Connect to WiFi → Initialize DHT22 → Configure web server
2. Main Loop
Read DHT22 → Update web page → Push MQTT → Delay 10s
3. Display Options
Web dashboard | MQTT to Home Assistant | OLED display
Why Build an ESP8266 Temperature Monitor?
Indoor climate monitoring has become a cornerstone of smart home automation in 2026. Whether you’re maintaining optimal conditions for a server room, monitoring a greenhouse, ensuring comfort in your home office, or automating your HVAC system, a reliable temperature and humidity sensor network is essential. Commercial solutions start at ₹2,000-5,000 per sensor, but with an ESP8266 and DHT22, you can build a comparable or better system for under ₹700.
Components and Bill of Materials
| Component | Estimated Price (₹) | Source |
|---|---|---|
| ESP8266 NodeMCU v3 | 350-500 | Amazon, Robu.in |
| DHT22 Sensor Module | 200-350 | Amazon, Robu.in |
| Breadboard + Jumper Wires | 100-200 | Amazon |
| 10kΩ Resistor (pack) | 10-20 | Any electronics shop |
| Micro USB Cable + Charger | 100-150 | Already have at home |
| Total | ₹660-1,220 |
Wiring the Circuit
The DHT22 sensor has four pins (some modules come with three pins on a PCB). Here’s the wiring connection:
ESP8266 NodeMCU      DHT22 Sensor
-----------------    ------------
3.3V (pin)    ────   VCC (pin 1)
GND           ────   GND (pin 4)
D4 (GPIO2)    ────   DATA (pin 2)
3.3V ──[10kΩ]───►   DATA (pull-up resistor)
If you’re using a DHT22 PCB module (common from Indian suppliers), the pin labeling may differ — look for +/VCC, -/GND, and out/SIG markings. The 10kΩ pull-up resistor between VCC and DATA is critical for reliable communication. Without it, you’ll get intermittent reading failures or NaN values.
Installing the Software
Arduino IDE Setup
- Install Arduino IDE from arduino.cc if you haven’t already
- Go to File > Preferences and add this URL to “Additional Board Manager URLs”:
http://arduino.esp8266.com/stable/package_esp8266com_index.json
- Go to Tools > Board > Board Manager, search for “esp8266” and install
- Install the DHT sensor library: Sketch > Include Library > Manage Libraries, search for “DHT sensor library” by Adafruit
Upload the Code
#include <ESP8266WiFi.h>
#include <ESP8266WebServer.h>
#include <DHT.h>
#define DHTPIN 2 // GPIO2 = D4 on NodeMCU
#define DHTTYPE DHT22
const char* ssid = "YOUR_WIFI_SSID";
const char* password = "YOUR_WIFI_PASS";
DHT dht(DHTPIN, DHTTYPE);
ESP8266WebServer server(80);
void setup() {
Serial.begin(115200);
dht.begin();
WiFi.begin(ssid, password);
while (WiFi.status() != WL_CONNECTED) {
delay(500);
Serial.print(".");
}
Serial.println("nConnected: " + WiFi.localIP().toString());
server.on("/", handleRoot);
server.begin();
}
void loop() {
server.handleClient();
delay(10000); // Read every 10 seconds
}
void handleRoot() {
float h = dht.readHumidity();
float t = dht.readTemperature();
String html = "<html><head><meta http-equiv='refresh' content='10'></head>";
html += "<body style='font-family:Arial;text-align:center;padding:50px;background:#1a1a2e;color:#fff;'>";
html += "<h1>ESP8266 Sensor Monitor</h1>";
html += "<h2>Temperature: " + String(t) + " °C</h2>";
html += "<h2>Humidity: " + String(h) + " %</h2>";
html += "<p>Auto-refreshes every 10 seconds</p></body></html>";
server.send(200, "text/html", html);
}
MQTT Integration for Home Assistant
To integrate with Home Assistant, add MQTT publish functionality. You’ll need a running MQTT broker (Mosquitto is recommended):
// Add before setup():
#include <PubSubClient.h>
WiFiClient espClient;
PubSubClient client(espClient);

// In setup():
client.setServer("192.168.1.100", 1883); // Your MQTT broker IP

// In loop():
if (!client.connected()) {
  client.connect("ESP8266_Sensor");
}
client.loop();

// In handleRoot():
client.publish("home/sensor/temperature", String(t).c_str());
client.publish("home/sensor/humidity", String(h).c_str());
In Home Assistant, add these to your configuration.yaml:
sensor:
  - platform: mqtt
    name: "Living Room Temperature"
    state_topic: "home/sensor/temperature"
    unit_of_measurement: "°C"

  - platform: mqtt
    name: "Living Room Humidity"
    state_topic: "home/sensor/humidity"
    unit_of_measurement: "%"
Calibration Tips
The DHT22 has an accuracy of ±0.5°C and ±2% RH — good enough for most residential applications but not for lab-grade measurements. For better accuracy:
- Place the sensor away from direct sunlight and heat sources
- Avoid mounting near electronics that generate heat (keep the ESP8266 board separate)
- Allow 2 minutes after power-up for readings to stabilize
- Check against a known-accurate thermometer for offset calibration
- Consider the BME280 sensor (±1°C, ±3% RH plus barometric pressure) for ₹400 more
Power Consumption and Enclosure
The ESP8266 draws about 70 mA when active with WiFi. For a mains-powered installation, any USB charger works. For battery operation, consider ESP8266 deep sleep mode (drawing ~20 µA) with a wake interval of 5-10 minutes. In deep sleep mode, a 2000 mAh battery lasts approximately 2-3 weeks.
For the enclosure, any standard waterproof junction box from an electrical shop works. Drill a small vent hole near the sensor for air circulation. Remember: placing the sensor inside a sealed plastic box will trap heat from the ESP8266 and give false readings.
FAQ
Can I use DHT11 instead of DHT22?
Yes, the DHT11 is cheaper (₹100-150) but less accurate (±2°C vs ±0.5°C) and has a narrower range (0-50°C vs -40 to 80°C). For basic room monitoring, DHT11 works; for any serious application, DHT22 is worth the extra cost.
How many sensors can one ESP8266 handle?
With GPIO multiplexing, one ESP8266 can handle 4-6 DHT22 sensors. For larger deployments, use one ESP8266 per sensor or switch to a 1-Wire protocol with DS18B20 temperature sensors.
Can this work without Home Assistant?
Yes, the built-in web server provides a dashboard accessible from any browser. You can also use Blynk, ThingsBoard, or a custom mobile app for visualization.
Related Reading
Sources
Disclosure: As an Amazon Associate, we earn from qualifying purchases. Some links on this page are affiliate links that help support our content at no extra cost to you.