Key Takeaway: Getting started with STM32 programming requires STM32CubeIDE, a basic understanding of ARM Cortex-M architecture, and a structured approach to peripheral configuration — but the investment pays off with industrial-grade performance and reliability.
Table of Contents
1. Why Learn STM32 Programming?
STM32 microcontrollers power millions of industrial devices worldwide — from factory automation controllers and robotic arms to medical devices and electric vehicle drivetrains. Learning STM32 programming opens the door to professional embedded systems development that goes far beyond what hobbyist platforms can offer.
The ARM Cortex-M architecture used in STM32 devices is the industry standard for embedded systems. Understanding STM32 programming translates directly to skills applicable to other ARM-based microcontrollers from NXP, Texas Instruments, Infineon, and Renesas. This makes STM32 an excellent platform for building career skills in embedded engineering.
STM32 programming also introduces you to concepts like interrupt priority management, DMA (Direct Memory Access) for zero-CPU-overhead data transfers, and low-power modes essential for battery-operated industrial sensors. These concepts are fundamental to professional embedded development but are often abstracted away in simpler platforms.
2. Choosing Your First STM32 Board
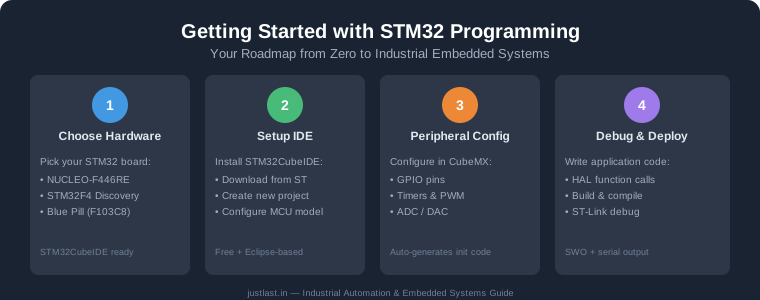
For beginners, the right development board significantly impacts the learning experience. Here are the best options for learning STM32 programming:
NUCLEO-F446RE ($12-15): This is our top recommendation. It features an STM32F446RE with a Cortex-M4 FPU running at 180 MHz, 128 KB SRAM, and 512 KB flash. The board includes an integrated ST-Link/V2-1 debugger, Arduino Uno compatibility headers, and Morpho expansion headers. You only need a USB cable to start programming.
STM32F4 Discovery ($15-20): Includes an STM32F407VG with a built-in ST-Link debugger, audio DAC, MEMS digital microphone, and accelerometer. The onboard sensors make it excellent for learning sensor integration while practicing STM32 programming.
Blue Pill (STM32F103C8) ($3-5): The most affordable option, popular in the maker community. It uses an older STM32F103C8 with Cortex-M3 at 72 MHz. Note that it requires a separate ST-Link programmer/debugger, which adds $5-8 to the total cost. The lack of genuine ST-Link integration makes debugging more challenging for beginners.
STM32G0 Nucleo-32 ($10-12): A modern entry-level option featuring the STM32G031 with Cortex-M0+ core. Despite its lower performance, it introduces the latest STM32G0 architecture with improved power efficiency and modern peripherals.
3. Setting Up STM32CubeIDE
STM32CubeIDE is STMicroelectronics’ free integrated development environment based on Eclipse and the GCC toolchain. It combines STM32CubeMX configuration tools with a full-featured IDE and debugger interface.
To get started with STM32 programming in STM32CubeIDE:
- Download STM32CubeIDE from st.com (free registration required)
- Install and launch — the installer includes the GCC ARM compiler and OpenOCD debugger
- Select a workspace directory for your projects
- Click “Start new STM32 project” to open the target selector
- Search for your microcontroller by part number or select from the board list
The integrated STM32CubeMX tool opens automatically when creating a new project. This graphical pin configuration tool lets you assign peripheral functions to GPIO pins, configure clock trees, and set up DMA channels. The generated initialization code is production-ready and follows ST’s HAL conventions.
One of the most powerful features for STM32 programming is the pinout conflict detection. CubeMX immediately highlights when two peripherals require the same pin, preventing hardware conflicts before you write a single line of code.
4. Your First STM32 Project
Let’s create a classic LED blinking project to understand the STM32 programming workflow:
- Create a new project for your chosen STM32 device
- In CubeMX, select your LED GPIO pin as “Output”
- Configure the system clock — for most projects, select “Crystal/Ceramic Resonator” on RCC and set HSE as the clock source
- Set the clock speed in the Clock Configuration tab (start with 16-84 MHz)
- Go to “Project Manager” tab, name your project, and generate code
- In the generated main.c, add your application code inside the main while(1) loop
- Use HAL_GPIO_WritePin() to set pins high/low and HAL_Delay() for timing
- Build the project (hammer icon or Ctrl+B)
- Connect your board via USB and click Debug (bug icon) to flash and debug
5. GPIO Programming with HAL
The STM32 HAL (Hardware Abstraction Layer) provides a consistent API for STM32 programming across all STM32 families. Key GPIO functions include:
HAL_GPIO_WritePin(GPIOx, GPIO_PIN_x, GPIO_PIN_SET/RESET): Sets a pin high or low. For example, HAL_GPIO_WritePin(GPIOA, GPIO_PIN_5, GPIO_PIN_SET) turns on the pin.
HAL_GPIO_TogglePin(GPIOx, GPIO_PIN_x): Toggles the pin state — useful for LED indicators or generating square waves.
HAL_GPIO_ReadPin(GPIOx, GPIO_PIN_x): Reads the digital state of an input pin. Returns GPIO_PIN_SET or GPIO_PIN_RESET.
HAL_GPIO_EXTI_Callback(uint16_t GPIO_Pin): Interrupt callback function triggered on pin state change. Override this function to handle external interrupts without polling.
6. Timers and PWM
STM32’s timer peripherals are exceptionally powerful compared to Arduino. The advanced-control timers (TIM1 and TIM8) can generate PWM signals with programmable dead-time insertion, essential for driving H-bridge motor controllers without MOSFET shoot-through.
For industrial STM32 programming, PWM generation using hardware timers is preferred over software bit-banging because it operates independently of the CPU. Once configured, the timer generates precise PWM signals without any CPU intervention, freeing processing power for control algorithms and communication handling.
STM32 timers also support encoder interface mode, which directly decodes quadrature encoder signals from motors or linear actuators. This eliminates the need for external encoder counter ICs and provides accurate position and velocity feedback for closed-loop control.
7. Communication Protocols
Industrial STM32 programming almost always involves communication protocols. The STM32 HAL provides comprehensive support for:
UART (USART): For serial communication with PCs, GPS modules, and simple sensors. The HAL_UART_Transmit() and HAL_UART_Receive() functions handle data transfer with optional interrupt or DMA modes.
I2C: For connecting to sensors, EEPROMs, and display modules. STM32 supports multi-master I2C with clock stretching and 7-bit/10-bit addressing.
SPI: For high-speed communication with ADCs, DACs, and SD cards. The STM32 SPI peripheral supports up to 45 Mbps with hardware chip select management.
CAN: The most important protocol for industrial STM32 programming. STM32’s bxCAN peripheral (Basic Extended CAN) handles CAN 2.0B frames with hardware filtering, reducing CPU load significantly.
Frequently Asked Questions
What is the best IDE for STM32 programming?
STM32CubeIDE is recommended for beginners as it integrates CubeMX, GCC compiler, and debugger in one package. Advanced users may prefer Keil MDK or IAR EWARM for optimized code generation.
Can I program STM32 using Arduino IDE?
Yes, through the STM32duino project (STM32 core for Arduino IDE). However, this limits access to STM32-specific features like DMA and advanced timers. For industrial applications, native STM32 programming with HAL is recommended.
How long does it take to learn STM32 programming?
With prior microcontroller experience, expect 2-4 weeks to become productive with basic STM32 programming. Mastering advanced features like DMA, FreeRTOS, and CAN protocols typically requires 2-3 months of consistent practice.
Is STM32 better than Arduino for professional projects?
Yes, for professional and industrial projects, STM32 offers superior performance, memory, peripheral variety, and long-term reliability. Arduino is better suited for prototyping and educational contexts.
Related Reading
- STM32 vs Arduino: Which Microcontroller Platform is Right for Industrial Automation?
- More Embedded Systems Guides at justLast.in
Sources
- STM32CubeIDE Official Page
- STM32CubeIDE Installation Guide (PDF)
- DigiKey – STM32 101 Series
- STMicroelectronics STM32 MCU Wiki
Disclosure: This post contains affiliate links. We may earn a commission on qualifying purchases at no additional cost to you.