Key Takeaway: You can build a sturdy 2×4 workbench in one weekend for under ₹8,000 using 12 lengths of 2×4 studs, one sheet of 18mm plywood, and about 100 screws. A well-built workbench gives you a rock-solid surface for sawing, drilling, and assembly, and doubles as a strong clamping point for the rest of your workshop tools.
Table of Contents
1. Why Build Your Own Workbench
A workbench is the heart of any workshop. It holds your work while you saw, drill, sand, and assemble, and it absorbs the punishment that would otherwise ruin a dining table. Ready-made workbenches with a solid top cost ₹15,000-40,000 in India, while a 2×4 framed bench built from construction lumber costs under ₹8,000 and is often stronger because you choose the bracing and joinery yourself.
If you are wondering how to build a workbench on a tight budget, this complete plan is for you. It uses only construction lumber and tools you likely already own.
Building your own workbench also teaches you the core skills — measuring, cutting, squaring, and screwing — that every other woodworking project depends on. If you can build a workbench, you can build shelves, shop cabinets, and jigs.
2. Choosing the Right Design
The three most common DIY workbench designs are:
1. 2×4 Framed Workbench (recommended): A frame of 2×4 studs topped with 18mm plywood. It is cheap, fast to build, and strong enough for most tasks. This is the design covered in this guide.
2. Solid-Top Workbench: Laminated 2×4 or hardwood slabs form a 50-60mm thick top. Excellent for hand tool work and heavy planing, but expensive and heavy. The top alone can cost ₹6,000-10,000 in lumber.
3. Folding or Wall-Mounted Bench: A top that folds down from the wall. Great for small apartments and balconies, but not suitable for heavy work like planing or hammering.
For most home workshops in India, the 2×4 framed design with a plywood top is the sweet spot between cost, strength, and build time.
3. Materials and Cut List
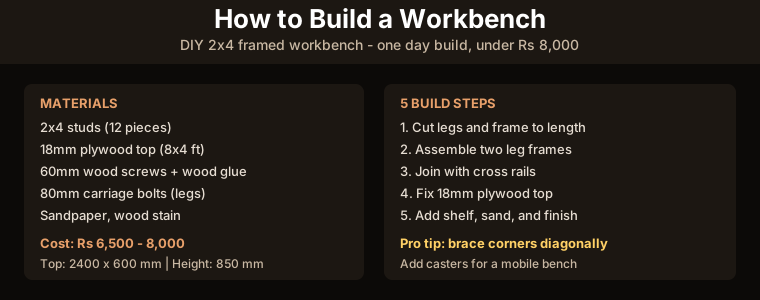
| Material | Quantity | Approx. Cost | Notes |
|---|---|---|---|
| 2×4 studs (8 ft) | 12 pieces | ₹2,800-3,600 | Use straight, dry studs |
| 18mm plywood (8×4 ft) | 1 sheet | ₹2,200-3,000 | Commercial ply or marine |
| 60mm wood screws | 1 kg box | ₹500-700 | Self-drilling, zinc-coated |
| 80mm carriage bolts | 8 pieces | ₹200-300 | For leg-to-rail joints |
| Wood glue + sandpaper | 1 bottle | ₹400-500 | PVA wood adhesive |
| Wood stain or PU paint | 1 litre | ₹600-900 | Optional finish |
Final dimensions used in this plan: Top 2400 x 600mm, height 850mm, depth 600mm. These are ergonomic for an average-height adult standing at the bench.
4. Step-by-Step Build Instructions
Step 1 — Cut the frame pieces. From 2×4 studs cut: four legs at 820mm (leaving room for the top), two long rails at 2280mm, four short rails at 540mm, and four diagonal braces at about 700mm (cut to fit).
Step 2 — Assemble the two leg frames. Each leg frame is two legs joined by a top short rail and a lower short rail. Use wood glue plus 60mm screws through the rails into the legs, driving two screws per joint. Clamp each joint square before screwing.
Step 3 — Join the leg frames with long rails. Stand both leg frames upright and connect them with the two long rails at the top, one at the front and one at the back. Check that the frame is square by measuring diagonals — they should be equal. Add the lower long rail at about 200mm from the floor to carry a shelf.
Step 4 — Brace the corners. Cut diagonal braces and fix them between the legs and the long rails. Diagonals stop the bench from racking (wobbling side to side), which is the most common failure of homemade benches.
Step 5 — Fit the top. Cut the 18mm plywood to 2400 x 600mm, or ask the timber shop to cut it for you. Screw it down from underneath into the top rails with 40mm screws. Predrill to avoid splitting. Countersink the screw heads flush.
Step 6 — Add a shelf and finish. Fix a second piece of plywood onto the lower rails for storage. Sand the whole bench, then apply two coats of PU varnish or a cheap weather-resistant paint to protect the plywood edges, which are the first part to absorb moisture and delaminate.
5. Useful Upgrades and Additions
- Vise: Bolt a 200mm woodworking vice to the front left corner. This single upgrade transforms the bench into a proper workholding station.
- Castors: Add four heavy-duty locking castors (₹1,200-1,800 for a set) so the bench can roll out of the way. Lock the castors before any heavy work.
- Tool well: Route a shallow 60mm wide tray along the back edge to keep screws and small parts from rolling onto the floor.
- Power strip: Mount a 6-socket power strip under the front rail so your circular saw, drill, and sander all reach without extension leads tangling.
- Pegboard back: A pegboard panel on the wall behind the bench keeps the most-used tools within arm’s reach.
6. Build Tips for Indian Climates
Indian humidity is hard on plywood edges and cheap MDF. Buy commercial-grade or marine plywood rather than furniture MDF for the top. Store the bench away from direct monsoon dampness, and seal every exposed plywood edge with varnish or paint before first use.
2×4 studs in Indian timber markets are often sold with rough dimensions and can be slightly twisted. Pick straight studs by sighting down their length at the shop, and reject any with large knots or splits. A slightly bowed stud can still be used for short rails where the bow is less noticeable.
For a quick bench, you can skip the diagonal braces by using 12mm plywood gusset plates glued and screwed across each corner. Gussets are faster than cutting angled braces and just as effective at preventing racking.
7. Frequently Asked Questions
How much does it cost to build a workbench in India?
A 2×4 framed workbench with a plywood top costs between ₹6,500 and ₹8,000 in materials. Adding a vice and castors raises the total to about ₹9,000-10,000, still well below the ₹15,000+ price of comparable ready-made benches.
What is the best height for a workbench?
For general workshop use, 850-900mm suits most adults. A simple test: stand with your arms relaxed at your sides, then raise your palms to the bench top. The top should be roughly at the crease of your wrist.
Can I build a workbench without power tools?
Yes, but it will take longer and require more skill. Have the timber shop cut your lumber to length, then use a hand saw for adjustments, a brace and bit or hand drill for holes, and screws or nails with a hammer. The 2×4 design works well with hand tools because the joints are simple butt joints.
Should I use MDF or plywood for the workbench top?
Use 18mm or thicker plywood. MDF is cheaper but swells and crumbles when it gets wet, and it is heavy and dusty to cut. Plywood resists moisture far better, holds screws more securely, and is easier to replace when the top becomes worn.
How long does it take to build a workbench?
Most people finish the basic bench in 4-6 hours of working time, or one weekend including the finish. Cutting all the lumber first, in one session, is the single biggest time-saver.
Related Reading
- Best Cordless Drill in India 2026: Complete Buying Guide
- Best Impact Driver in India 2026: Complete Buying Guide
- CNC Dust Collection Setup Guide 2026
Sources
- Bob Vila – How to Build a Workbench
- Amazon.in – Lumber, Screws, and Bench Hardware Pricing July 2026
- Flipkart – Workbench Components and Tool Pricing
Disclosure: As an Amazon Associate, we earn from qualifying purchases. Some links on this page are affiliate links that help support our content at no extra cost to you.