Key Takeaway: CNC machine calibration — squaring the frame, tramming the spindle, and compensating backlash — transforms a hobby machine that makes scrap into one that holds tight tolerances, and the checks take an afternoon with a dial indicator and some software settings.
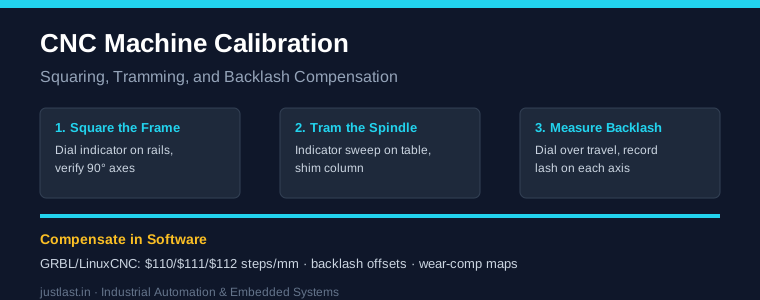
Table of Contents
1. Why CNC Machine Calibration Matters
If your parts come out slightly out of square, with elliptical holes or steps where surfaces should meet, the machine geometry — not the toolpath — is usually to blame. CNC machine calibration is the process of verifying and correcting mechanical alignment and motion errors so that commanded positions match actual tool positions. For a workshop producing jigs, plates, or actuator brackets, even 0.1 mm of accumulated error means parts that do not fit. Calibration is cheap, repeatable, and converts a hobby machine into a production tool.
2. Tools for CNC Calibration
You do not need expensive metrology gear to start. A good set includes: a dial test indicator (0.01 mm resolution) with a magnetic base, a precision square or an engineer’s square, machinist parallels or gauge blocks, and optionally a granite surface plate if you are chasing tight tolerances. A 1-2-3 block and feeler gauges round out the kit. Most of the squaring and tramming procedures below use only the dial indicator.
3. Squaring the Frame and Gantry
Squareness means each axis moves exactly perpendicular to the others. The classic check: mount the indicator to the spindle and run the X axis along a known straight reference on the table, then verify the Y axis against the same reference. On a moving-gantry router, gantry racking — one side leading the other — is the most common squareness fault and causes parallelogram-shaped parts. Loosen the gantry mounts, use a tramming bar or a length gauge, and clamp the gantry so both ends are equal, then re-tighten and re-check.
4. Tramming the Spindle
Tram is the spindle’s perpendicularity to the table. If the spindle leans, the bottom of a cutter leaves a recess or a step in the last pass because the side of the tool drags. To tram: mount the indicator in the spindle, position it to sweep a circle of radius about 100 mm on the table, and read the dial at four points around the circle. Rotate the spindle by hand. Any variation means the head is not parallel to the table plane; shim the head or adjust the riser until all four readings match. Two-plane (left-right and front-back) tram is the standard first pass.
5. Measuring and Compensating Backlash
Backlash is free play in the lead screw and nut or the belt/gears, causing motion to lag when direction reverses — the classic source of “steps” in the cut and undersized or oversized circular features. To measure backlash: set the indicator against the axis with the machine moved in, note the reading, back the axis off a small amount, then advance and find how much travel occurs before the indicator moves. That distance is the backlash for that axis. Repeat for all three axes. With ball screws, backlash is usually small; with acme leadscrews or V-wheels it can be tenths of a millimetre.
For small backlash, use the backlash compensation setting in your controller. For large backlash, tighten or replace the anti-backlash nut, re-check the anti-backlash spring tension in the coupling, or (for serious VLM machines) install zero-backlash couplings or change to a ballscrew.
6. Calibrating Steps per Unit
Steps per unit is the number of microstepping pulses needed to move one millimetre or one inch. If the finished part is consistently undersized, steps are too high; if oversized, they are too low. To calibrate: command a single-axis move of a known distance, say 100 mm, measure the actual travel with a dial gauge or scale, and scale the current steps/mm setting accordingly (new = old x commanded / measured). Do this on every axis after mechanics are tightened and after any big mill axis work.
7. Compensating in GRBL and LinuxCNC
On GRBL, steps per mm are stored in $100 (X), $101 (Y), and $102 (Z), and the runaway backlash/axis compensation is available. On LinuxCNC, inverse kinematics and axis backlash compensation are configured in the INI file, and WD_ settings or the halui widgets can tune it further. For upper-tier control systems, you can also map the run table (fine interpolation) to correct non-linearity per axis. Whenever you change settings, save settings with $ and re-run a multi-cut test part to confirm.
8. A Maintenance and Calibration Routine
Regular CNC machine calibration keeps tolerances from creeping. A practical programme: before every long project, do the square check and a 30-second backlasses test; monthly, tram the spindle and re-measure backlash; quarterly, re-torque the couplings, clean rails, and re-qualify the grid. Keep a log of the backlash and steps/mm values — a change over time is an early warning of a slipping coupling, a worn nut, or a problem with the linear bearing that can quietly ruin parts.
Frequently Asked Questions
How often should I calibrate my CNC machine?
At minimum before each big job and after any crash or mechanical work. A full re-check (square, tram, backlash) quarterly keeps tolerances consistent on a production machine.
What is the difference between squaring and tramming?
Squaring refers to the structural axes being perpendicular to each other (right-to-left and gantry alignment). Tramming refers to the spindle being perpendicular to the table plane. Both are part of full CNC calibration.
Can software fix mechanical backlash?
Yes, up to a point. GRBL and LinuxCNC backlash compensation corrects small, consistent backlash. Large or worn backlash best requires hardware: tighten nuts/couplings, or install zero-backlash options.
What tools do I need to calibrate a CNC router?
A dial test indicator with magnetic base, an edge/parallels, a scale or callipers, and the machine’s own control software for settings is usually sufficient.
Related Reading
- Feeds and Speeds for CNC Machining: Complete Guide with Formulas
- CNC Lathe Programming: Turning, Facing, and Threading
- Stepper Motor Driver Comparison for CNC
Sources
- Onefinity CNC Setup & Calibration Documentation
- GRBL Configuration – Steps per mm & Compensation
- LinuxCNC Backlash Compensation Documentation
Disclosure: This post contains affiliate links. As an Amazon Associate, justlast.in may earn a commission on qualifying purchases at no extra cost to you.